
Toy Photography Guide
Here you can find my ongoing selection of guides to help you to have fun with photographing your toys and figures; I have tried to make this guide as accessible as possible for all kinds of skill levels. If you like what I am doing, please consider to support me so that I can grow my collection of models and figures to photograph.
Please have fun taking photographs~
Index
On the rule of Thirds;
On Leading Lines;
On Variations of Shot;
On Camera Height and Horizon;
On Using Lighting to Add Clarity;
On Shutter Speed and ISO in Phone Cameras;
On Using Angles to Infer the Emotion of the Model;
On Understanding the Range of Motion;
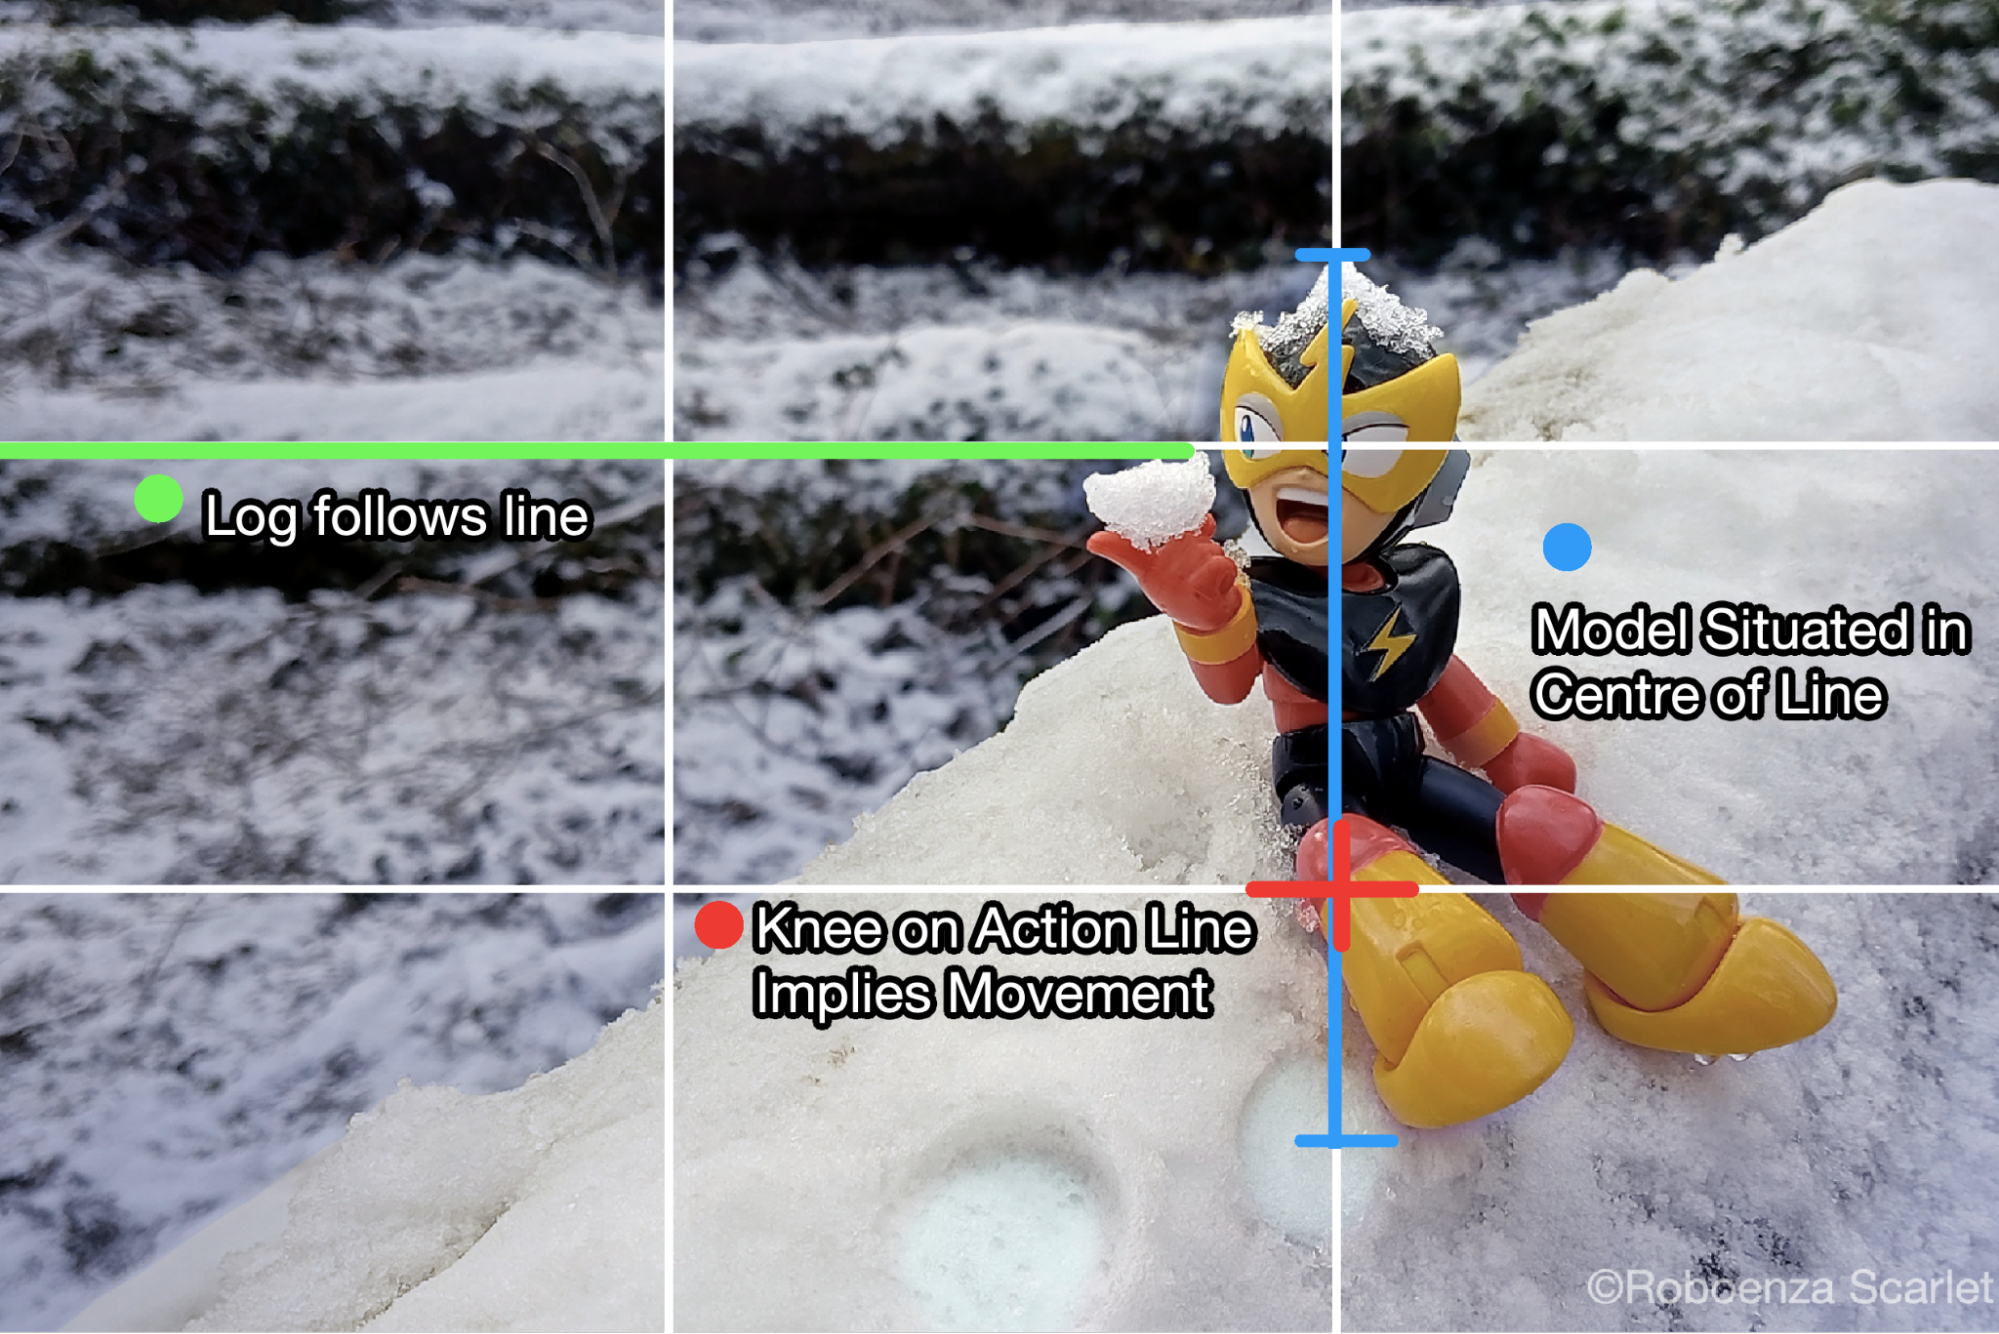
On the Rule of Thirds;
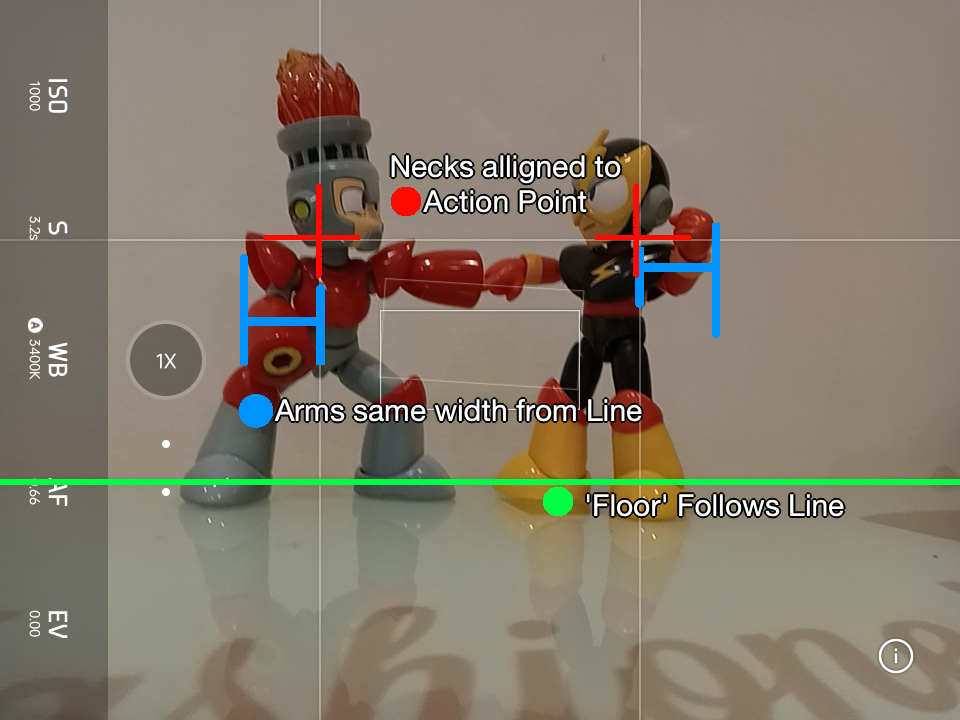
Composition is easy to learn, and tricky to master; luckily, the Rule of Thirds is an instant bolsterer to the quality of a photograph's composition. The 'Rule of Thirds' is a grid which splits your photograph into thirds. Using this grid is simple; it is a guideline to help to frame your image. It can be used in multiple ways - you can fit your subject neatly within a box, or focus an 'action' point on one of the intersecting lines, or fit the 'horizon' point of your image along one of these lines.
Here, 'line' refers to the horizontal and vertical lines of the grid, and 'action point' refers to the point in which the lines intersect.
Two possible options on using the Rule of Thirds on the same scene; there is no 'wrong' way to use this grid, so feel free to use it to frame your image however you feel fit.

Two wide-shot examples to further exemplify how broad and wide your usage of the grid can be; if you are struggling with a composition, try to line something up somewhere - it will help you to find a sense of balance and cohesion.
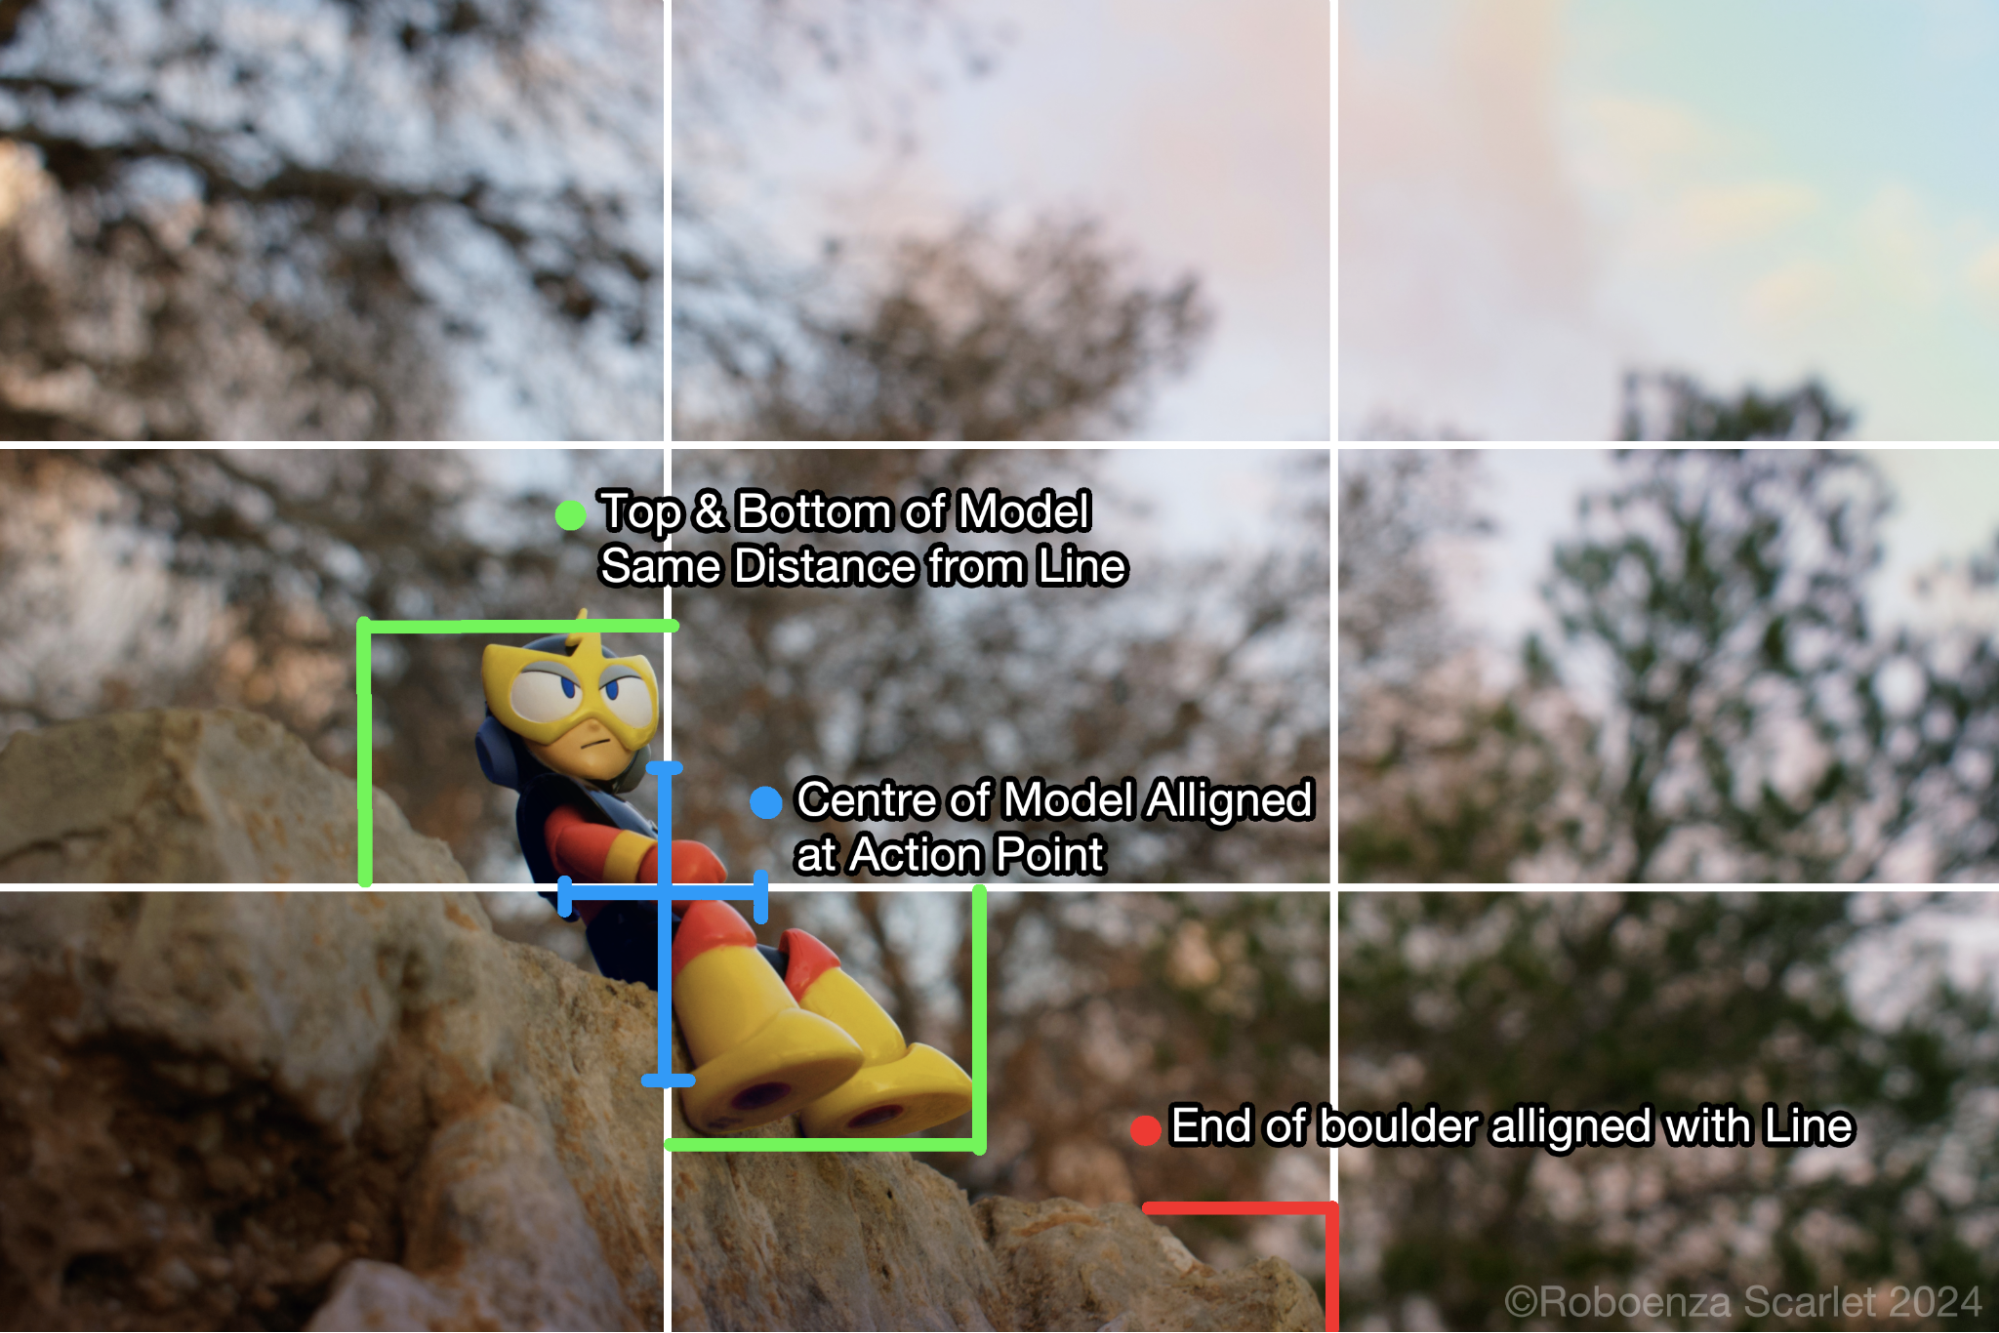
Two wide-shot examples to further exemplify how broad and wide your usage of the grid can be; if you are struggling with a composition, try to line something up somewhere - it will help you to find a sense of balance and cohesion.
Back to top
On Leading Lines;
Leading Lines are a slightly more complex compositional element which pulls the eye towards the intended focus of the image; this can be achieved using the horizon, or any manner of element which draws the eye. This is another element to take into account when taking a photograph; it is slightly harder to grasp, so do not feel disheartened if you struggle with it the first few times.

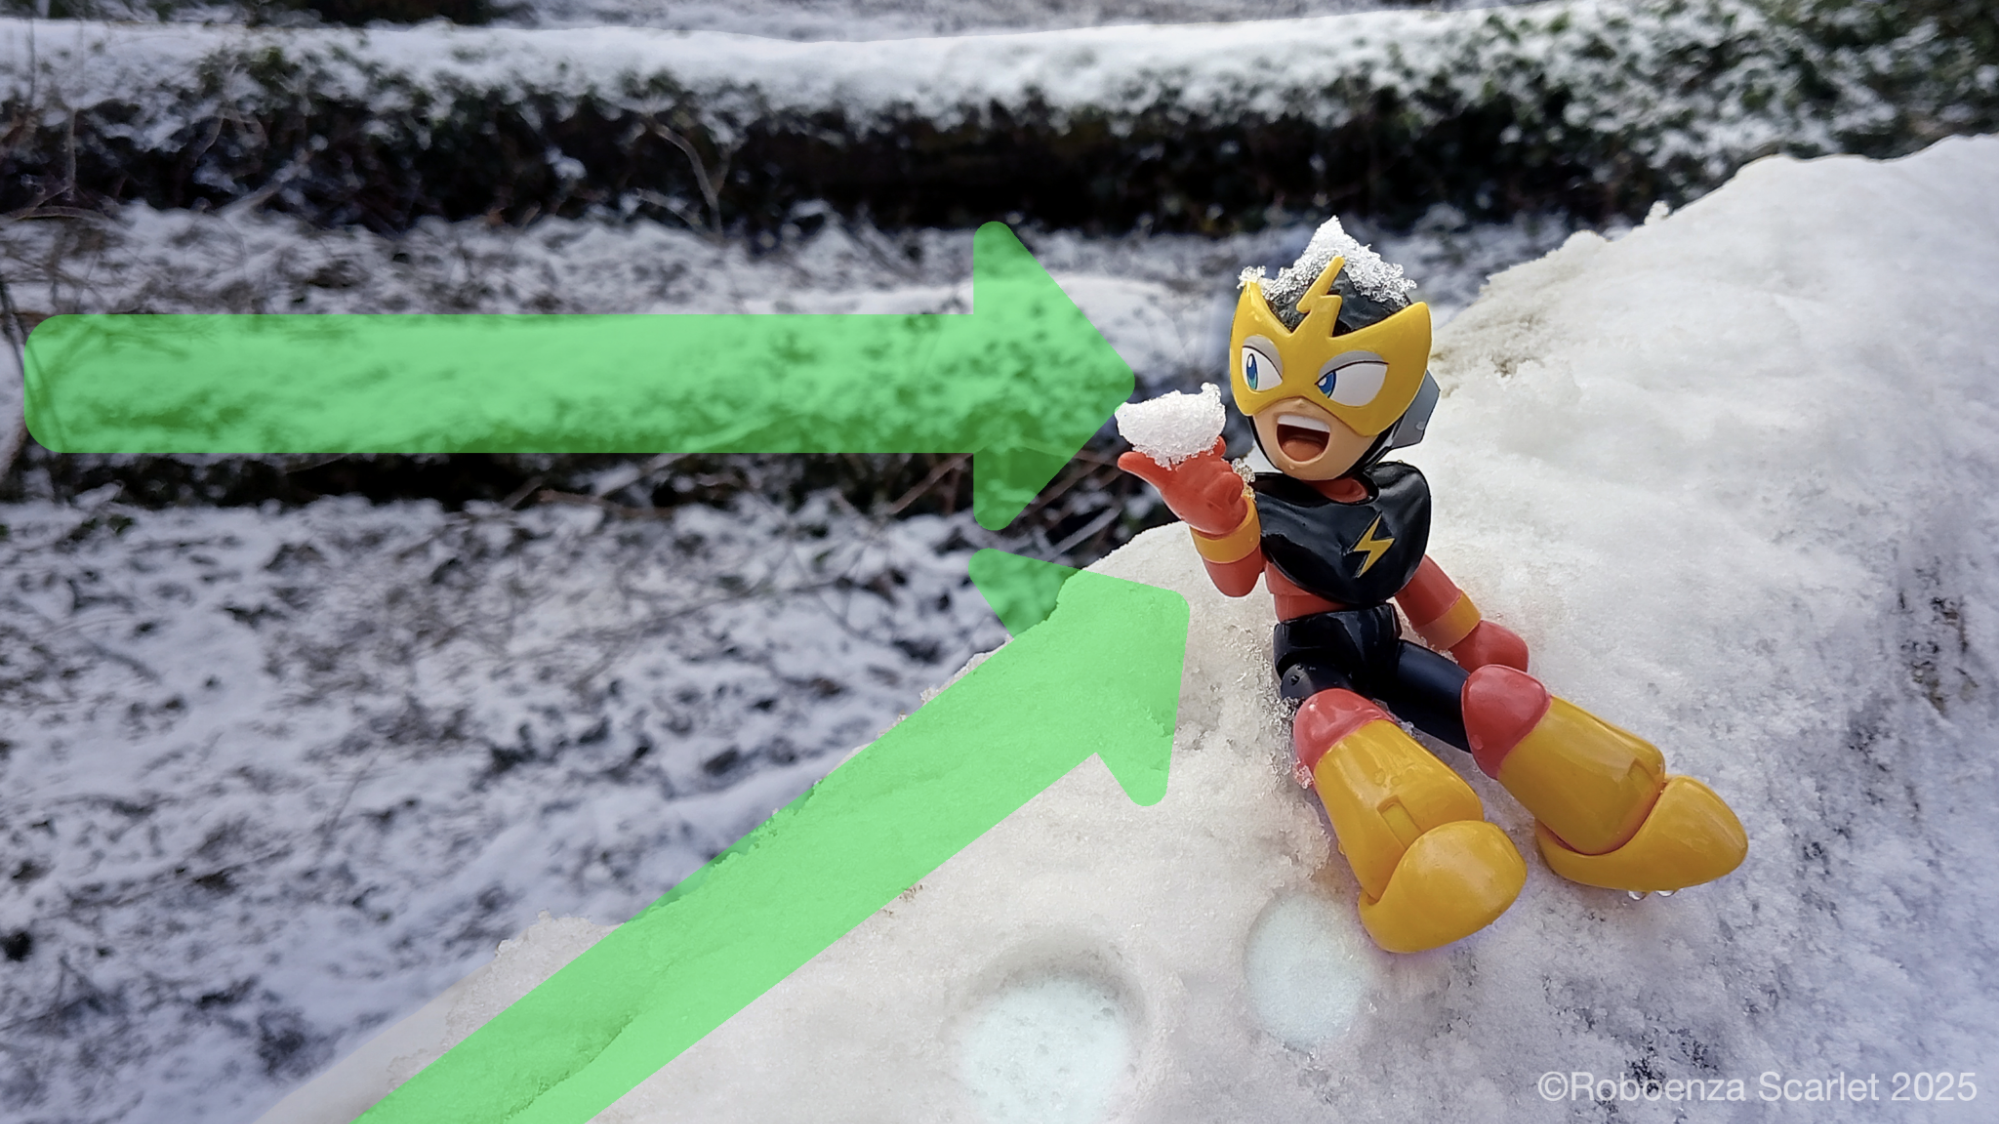
The eyes instinctively follow the log and snow slope along to focus on the action at the end of this tapered point - the hands of our model, holding snow. The idea is to lead the eyes towards the part of the image you would like to focus on - this is especially important to try to avoid a confusion of focus in wider shots. The goal is to lead the eye, not distract.
Back to top
On Variations of Shot;
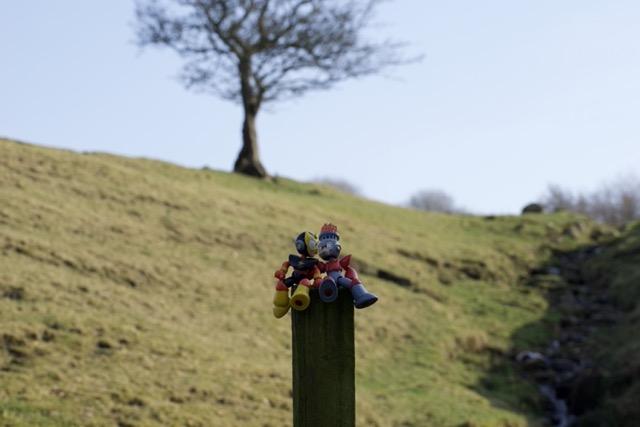
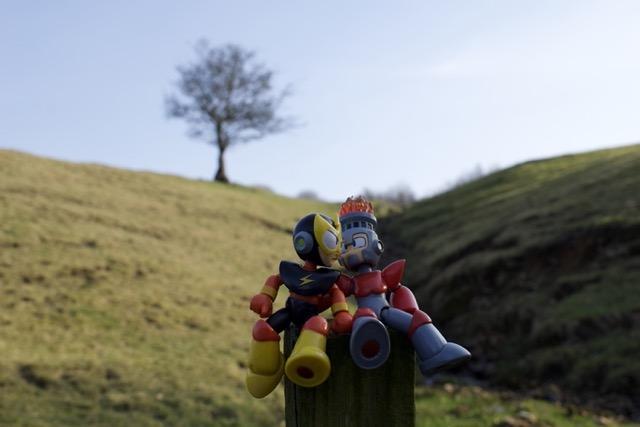
If your composition isn't working, don't be afraid to move your model further away from your camera. Of course, it is fine to take close-up shots; this advice is more of a trouble-shooting option if you find yourself frequently dissatisfied or struggling with composition. When you take a wide shot, it can be rewarding to pull out as far as you think you need - take a few shots - and then pull out even further, and take more shots; most of us will still pull in too tightly for the full effect, you will often find yourself delighted by the wider shots.
It can be tempting to only take close-up shots of your models; when the focus of the image is the model, it can seem like it is important to pull in tight. Think, now, about your favourite television show or movie; are you always pulled in so tight to the character that you can see their face? Are you still able to glean information about the character when they don't even take up a third of the screen? What kind of visual storytelling is going on when the character is filmed with a wide shot?
Let your model exist within the scene - they do not need to take up a large portion of the image to be the focus.


Close-up Shot VERSUS Long Shot; note the difference in emotion between the shots; the intention for this shot is "Elec Man relaxes after a hike in the mountains, taking in the scenery" - in order to communicate this, we need to see the mountain, we need to see the scenery. Despite the fact that he takes up a mere 1/9th of the photograph, he is still the focus of the image.
Back to top
On Camera Height and Horizon;
A very useful tool to change the composition of your image is to raise or lower the height of your camera - try taking photographs either from much farther down than you might think, or much higher up. This is especially useful if there are background elements which you would like to focus on, that don't quite seem to want to get into the shot.
Camera at a height of 150 centimetres VERSUS 35 centimetres; note how the background elements appear further away the closer the camera gets to the ground.
Make sure to play around with the height and angle of your camera when taking your shots; hold it high above, or far below for a wide range of variations.
Back to top
On Using Lighting to Add Clarity;
Having a basic grasp on lighting is an easy way to turn your photograph from good to great; in order to level the playing field for beginners, instead of using my Studio Lighting, this effect was created with a simple battery-powered torch (flashlight) affixed to a kitchen stand, adjusted until it was appropriately focused on the models.
If you have a secondary phone or tablet, or can borrow one, this is another helpful tool to create some extra lighting.


In this second image, the torch is poised directly onto the centre of the two characters, creating a dynamic and vibrant focus on them, drawing them out from the background.
Back to top
On Shutter Speed and ISO in Phone Cameras;
Most phone cameras will have a 'Pro' mode (sometimes called 'Manual' mode), which will let you adjust ISO, Shutter Speed, White Balance, Auto Focus, and Exposure Value. (Some models and Operating Systems may need additional Application downloads). For the sake of simplicity, I am going to narrow it down to Shutter Speed and ISO.
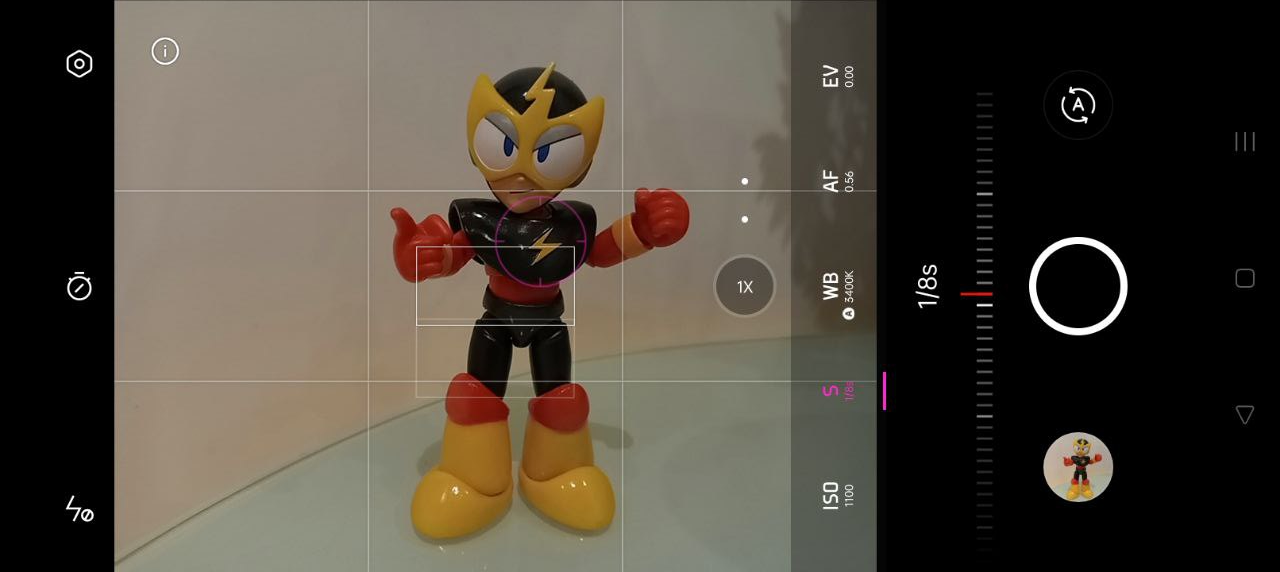
A longer Shutter Speed will add exposure to your image - if your image is too dark, try to change the Shutter Speed to a 'lower' number.
This sentance might not mean much to you at this point, but it will become aparrent as you take your Phone or Camera, and play around with the settings.
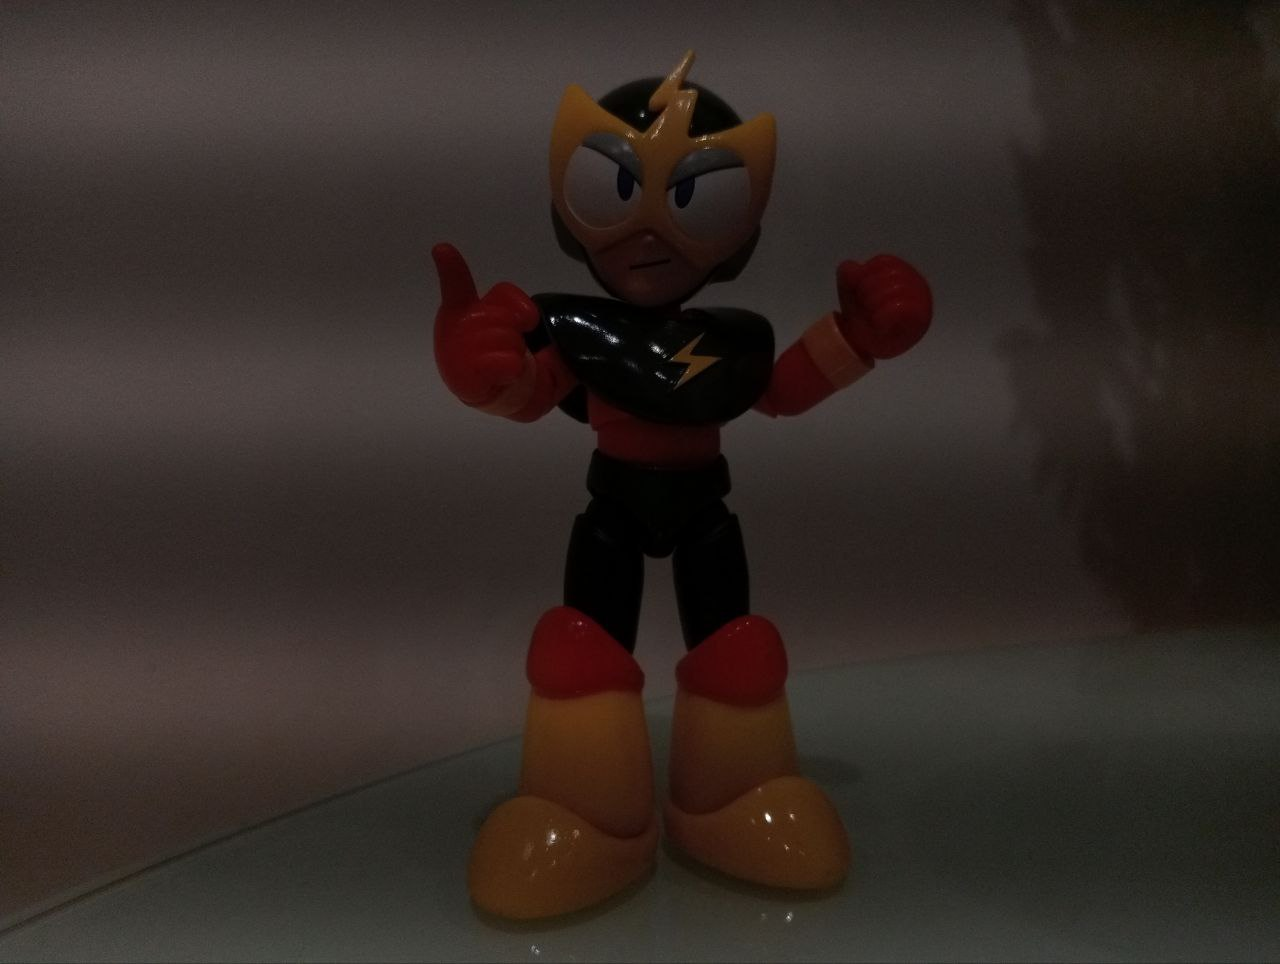
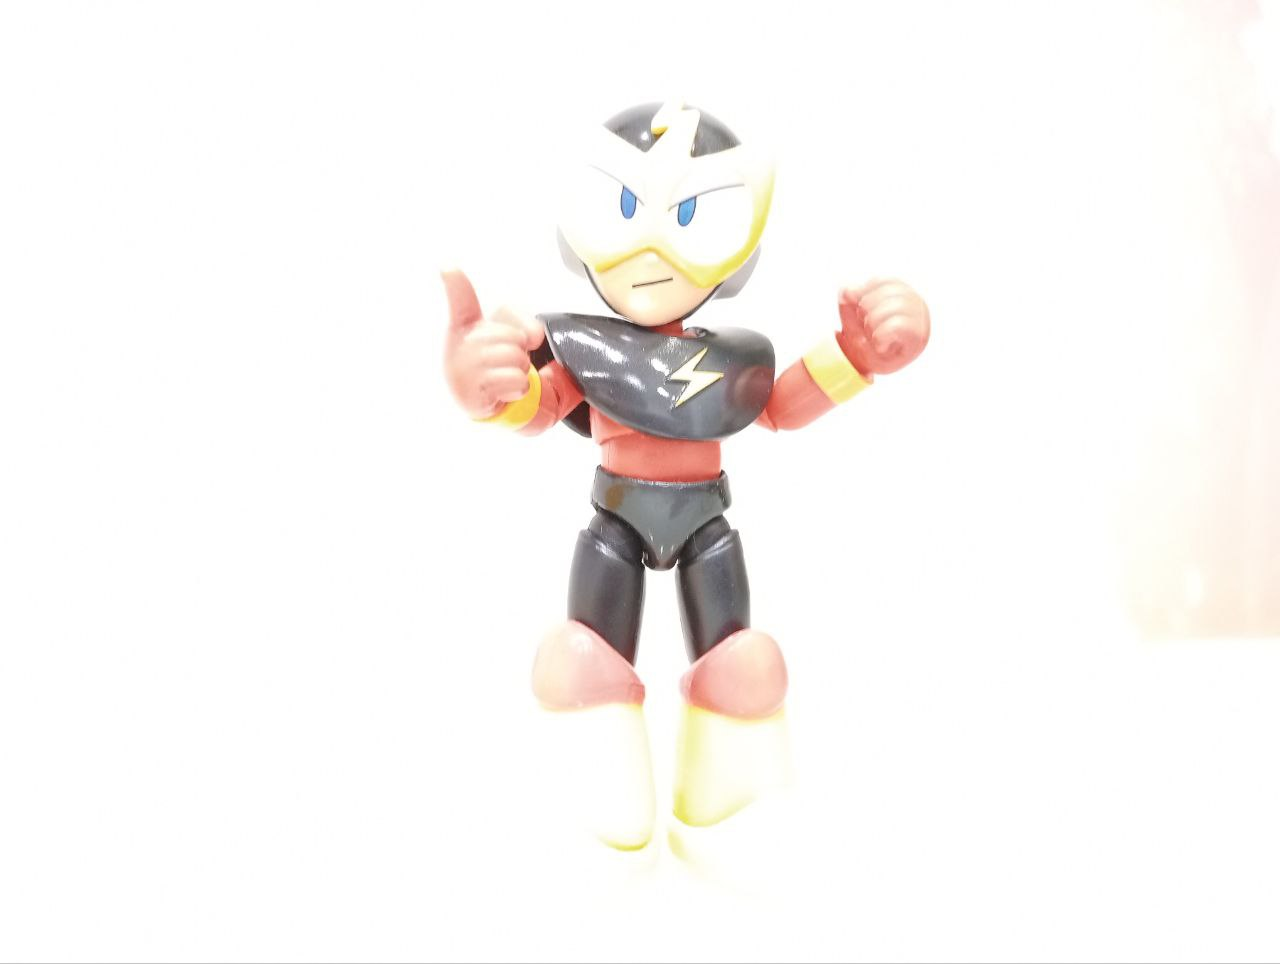
1/150 Second Shutter Speed VERSUS 16 Second Shutter Speed
If the Shutter Speed is not adjusting the lighting correctly for you, you can start to focus on ISO. Typically, you want your ISO value to be as low as possible, as a higher ISO value will add visual noise. If possible, you want to start from the lowest ISO value possible, and adjust the Shutter Speed until your image is the correct 'brightness'.


High Shutter Speed & Low ISO, VERSUS Low Shutter Speed & High ISO
Note the visual noise on the second image; if you look closely, it is less 'sharp' and has a much more grainy texture. The colours appear brighter on the first image, and the shadows are much cleaner cut on the first image than they are the second.
Back to top
On Using Angles to Infer the Emotion of the Model;
Of course, a toy cannot change its' face - this particular line of figures has interchangeable parts, this is still only two 'emotions'. In order to draw out as much emotion from these models to avoid the photographs from feeling too similar, we must focus mostly on body language - however, some subtle changes can be assumed by changing the positioning of the model.
Curved features on models' faces can be played with by placing the camera or model at various angles.


Because of the curvature of the eyelids and mouth on the JADA Toys Articulated Elec Man figure, he can be posed to look like he is wearing a mischievous smirk from one angle, and a frown from another.
Back to top
On Understanding the Range of Motion;
This part of the guide is explicitly for the JADA Toys Articulated MegaMan Figures, but it may be useful for other such figures.
In order to pose your figures, you must first understand the range of motion available to use. I will use the Elec Man figure as an example.
The range of motion this figure has relies entirely on ball-joints which connect directly to pivot-joints - the ball-joint section can rotate the limb 360°, and the pivot-joint adds an extra degree of up/down movement along a fixed axis. This joint configuration is utilised on the Shoulders, Elbows, Hands, Hips, and Knees of this figure.
The neck is a simple ball-joint, as you have probably found already when swapping the interchangeable heads - the two midriff joints which segment the chest and hips are larger ball-joints, and the feet are pivot-joints.
If a joint isn't going in the direction you would like, or your pose seems especially stiff, try rotating the segment before it - i.e, if the elbow isn't rotating, then move up and start to rotate the shoulder - to see if you can further exaggerate the motion further down the body.

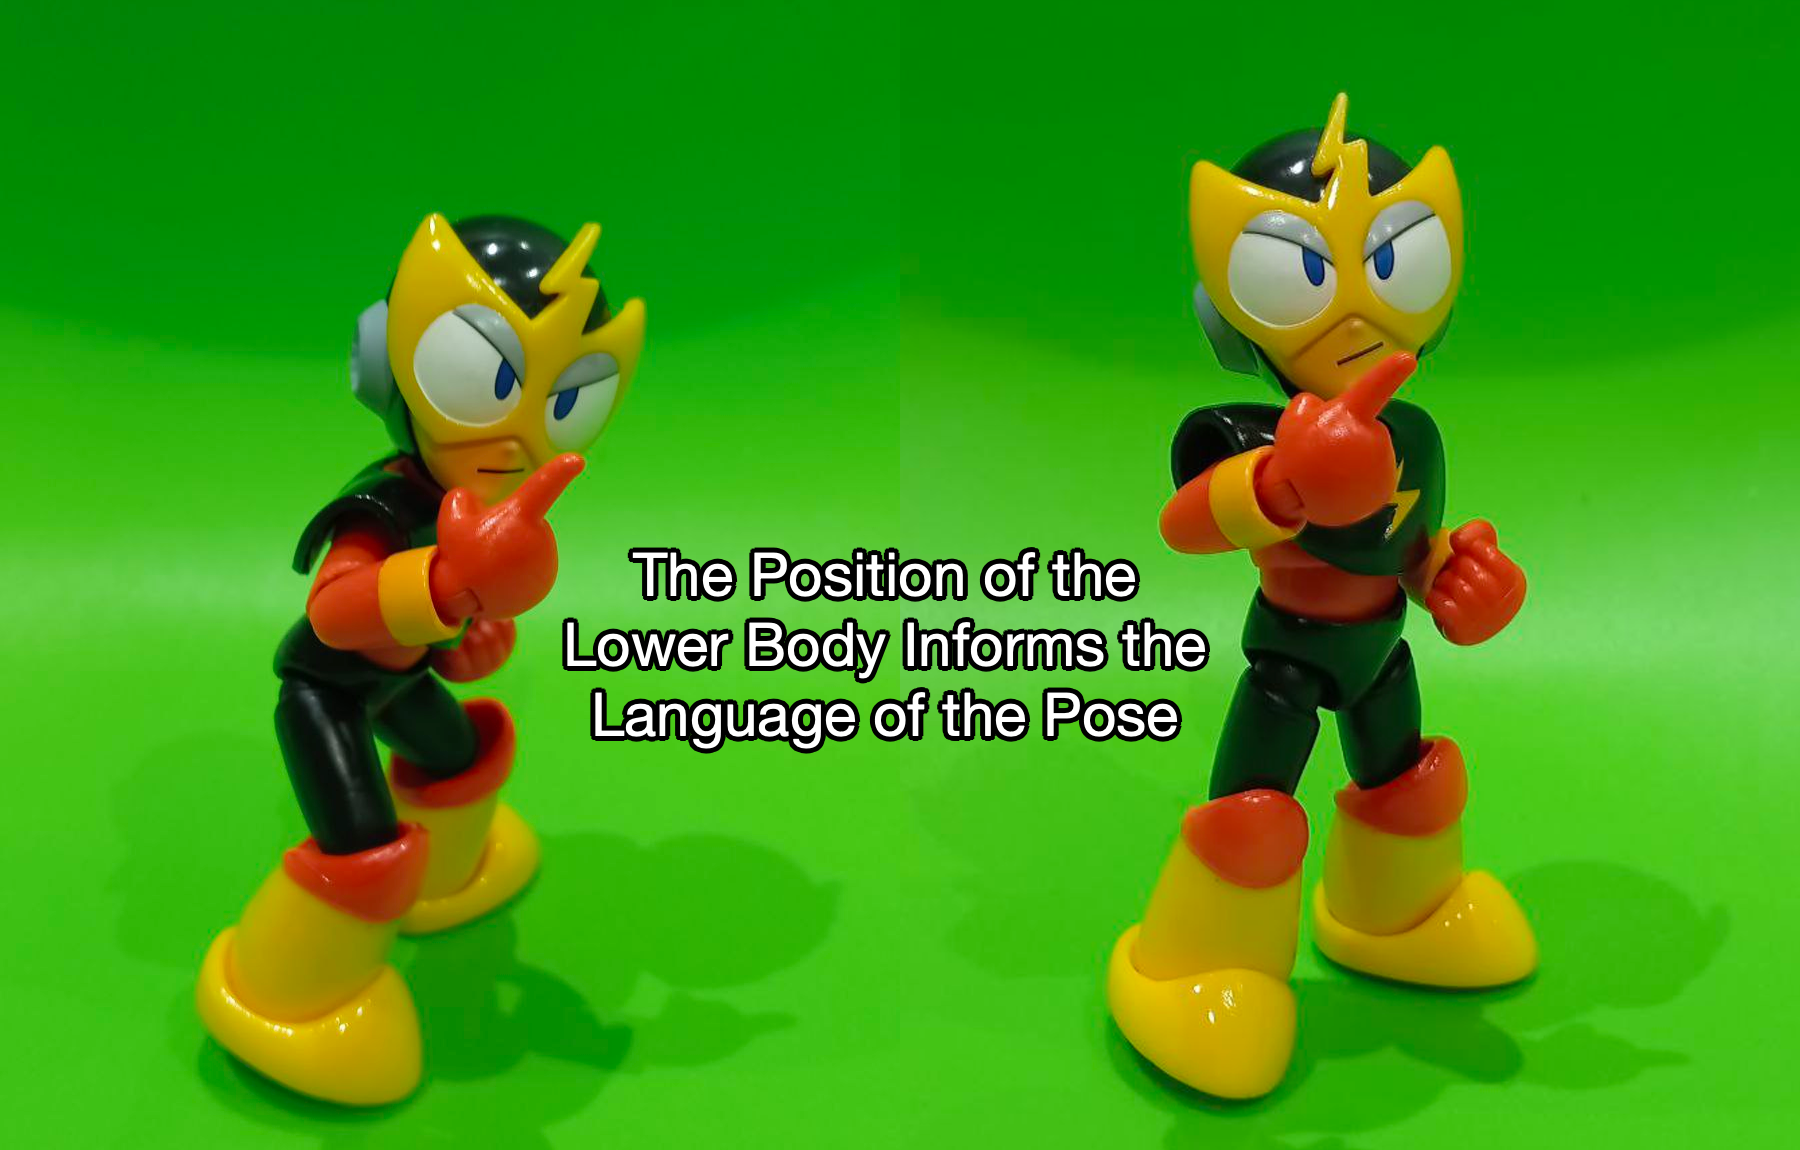
The left pose was made without rotating the shoulders' ball-joint - as you can see, the elbow joint can only move so high along its' pivot joint. The right pose was made by rotating the shoulder joint until the widest part of its' pivot allowed the rest of the arm to point straight up.
All good poses start further back than you might assume - if your pose seems strangely off-balance, try changing the angle of the feet or waist, the pivot angle of the leg, or putting more bend into the knees.
Try to work out what body language you would like to infer; a more hunched-over look can imply a sense of mischief or secrecy, or perhaps a fighting stance - a straighter back and leg looks more confident and eloquent. It is also important to note the height of your character in the scene they are in - a shorter-stacked pose like the left pose will fill less of the frame, which can be useful if the model is taller than its surroundings, and vice-versa.
Never forcibly move your figure. Sometimes the joints might get a little bit stuck if they have not been moved for a long time (i.e; Fresh out of the box, In storage for a few months) - but this will come loose with minimal pressure. Do not try to bend your figure in a direction it is not moving, this can break the fragile joints.
Back to top